Bambu Lab A1
Is a 0.2mm nozzle worth it for small prints?
A 0.2mm nozzle costs very little and everyone says it is better for miniatures. This is five prints of the same 40mm crusader trying to find out how much better, and where it stops mattering. The short version: layer lines disappear almost at once, and the interesting question quickly becomes what else is limiting the print, which turns out not to be the nozzle.
What I used
- Bambu Lab A1 stainless steel nozzle set, 0.2 / 0.4 / 0.6
The standard Bambu part, bought as the three nozzle set rather than the 0.2 alone. Worth knowing before you order: the set does not include a silicone protector, and the one on your printer is the one you keep using.
Same filament as the 0.4mm test, deliberately, so the comparison is about the nozzle and nothing else.
Fat Dragon Games' own profile, pay what you want. It requires a 0.2mm nozzle, so there is no point downloading it for a 0.4. Their page is titled for the A1 Mini but the profile covers the full A1 as well. Not an affiliate link, and their download goes through their own referral, which is the point.
This crusader has a mace on a thin handle, a cloak that hangs free at the front, and ankles. All three came off at some point during support removal. Whether you need any of this depends on your model.
Steps
Print your comparison on the 0.4 first
Print the model once on the nozzle you already have, using settings you have already tuned, before you change anything. Otherwise you are comparing a 0.2mm nozzle against a stock profile and learning nothing about the nozzle. That first print here took about two hours and looked good, with the face and the chest armour decoration reading as slightly muddy. Those muddy areas are the thing to watch afterwards.
Swap the nozzle, and tell the printer
Change the nozzle on the machine, then tell the printer itself which nozzle is fitted. This is separate from anything in the slicer and it is easy to do one and forget the other. While the hotend is apart, look at the silicone protector. Mine was full of dried filament hair and I had never cleaned it, because taking it off feels like it will tear.
I used: Bambu Lab A1 stainless steel nozzle set, 0.2 / 0.4 / 0.6
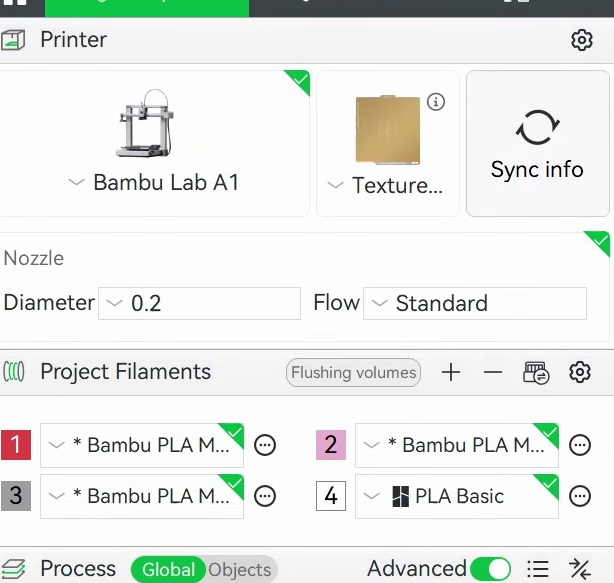
Switch Bambu Studio to the 0.2 nozzle and pick a profile
Set the nozzle diameter in Bambu Studio to 0.2, which gives you a different set of profiles. I went straight to 0.10mm High Quality rather than the standard, on the basis that if the point is detail there is no reason to start lower.
Check what carried over from your 0.4 profile
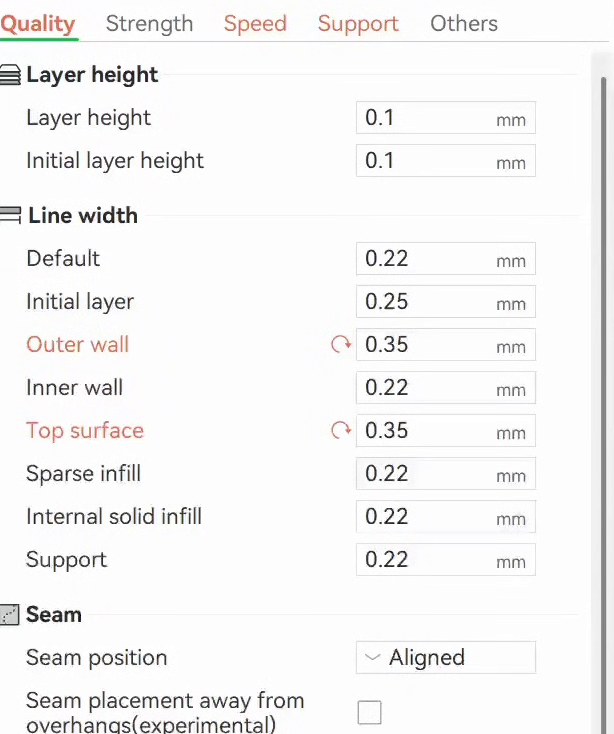
This is the step I got wrong, and it is worth a minute of your time. Changing nozzle does not clear values you overrode on the old profile. Here the line widths were still on the 0.35mm I had set for the 0.4mm nozzle, while the 0.2 profile's own defaults are 0.22mm for most things. Anything you changed shows in orange with a reset arrow beside it, so the orange is the thing to scan for. I did not notice until the print was more than half done.
Slice, and look at what you already have
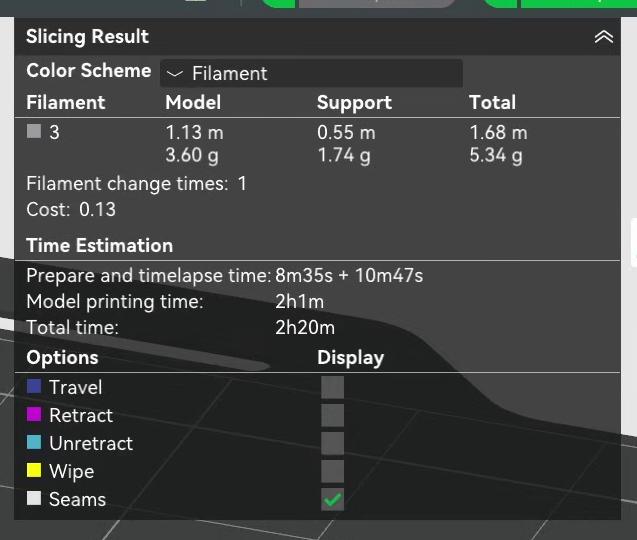
2h1m of printing, 2h20m total, which is roughly what the 0.4mm took. Even with the wrong line widths, the detail was clearly better: the face had features, the chest armour decoration was distinct, the boot plates read as plates. Layer lines were essentially gone. That is the answer to the question in the title arriving about ten minutes into the job, before any tuning at all.
Reset properly, then try the community settings
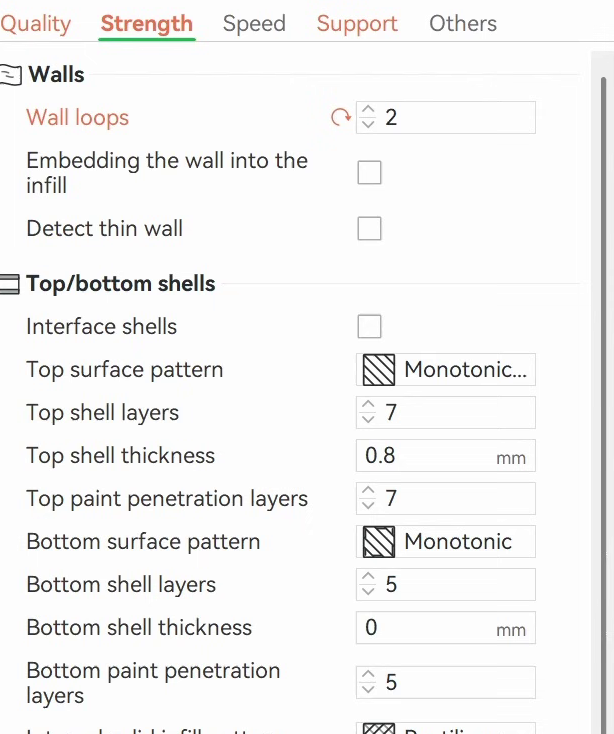
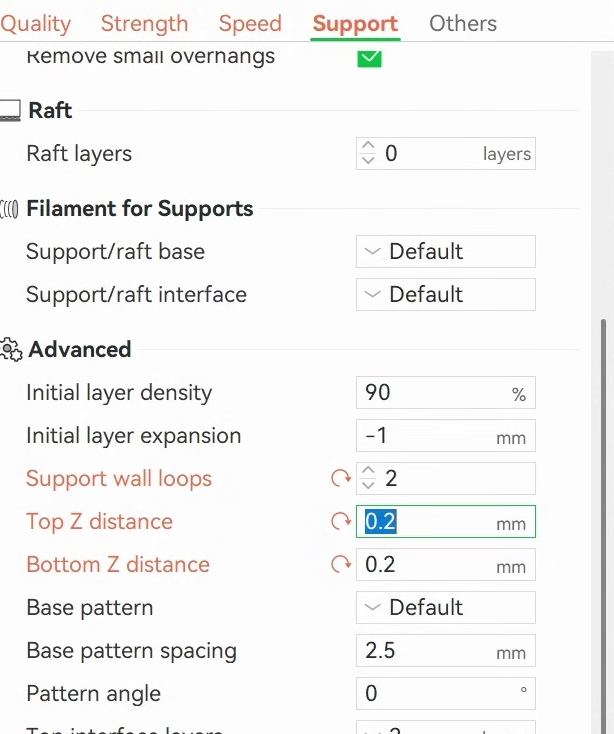
I reset everything except the support settings and printed again, which came out at much the same time. Then I applied a set of settings a viewer posted in the comments on the previous video, credited to Riley Allen 6032, translated from their P1S to my A1. The changes are wall loops to 2, sparse infill to 12% gyroid, top surface speed to 100, smoothing wall speed along the Z axis turned on, and on the support side wall loops from -1 to 2 with top and bottom Z distance at 0.2mm. If you cannot find the smoothing option, turn on developer mode.
Set the supports the same way
On the Support tab, support wall loops go from the default -1 to 2, and top and bottom Z distance to 0.2mm, which is the same gap that worked on the 0.4mm nozzle. Sliced at 2h6m of printing, 2h25m total. The result was sharp: shoulder guards, the ridges on the front pouches, the boot plates. Better than the previous print, but only just, and by this point the differences are the sort you have to go looking for.
Try the Fat Dragon Games profile
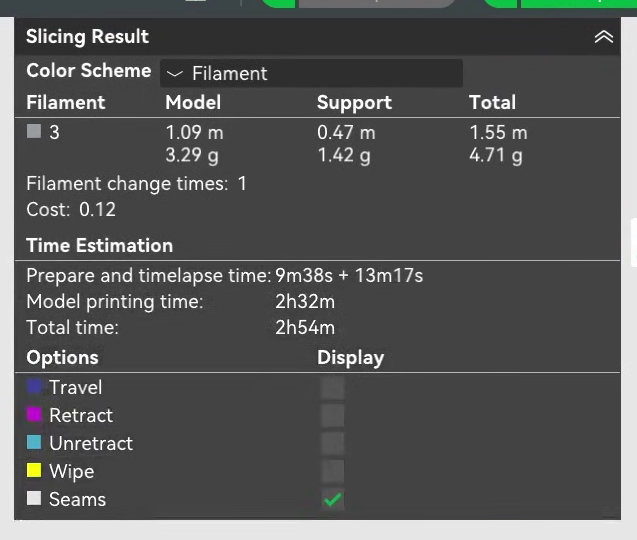
Several people suggested it, so I paid for it and ran it unmodified. 2h32m of printing, 2h54m total, so they have made speed choices of their own. The print was good and the front details looked perhaps slightly sharper than the previous one, though that is subjective and I would not want to defend it too hard. It also kept the foot intact, which nothing else managed reliably.
I used: FDG Custom Bambu Studio Miniatures Profile
Push it as far as it goes, and watch it stop mattering
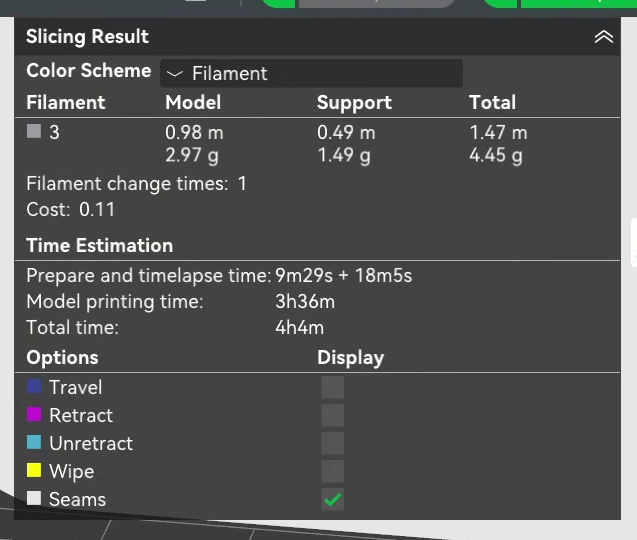
Last attempt: 0.06mm High Quality, smoothing along Z on, wall loops back to 2, and everything slowed down. 3h36m of printing, 4h4m total, so nearly twice the first 0.2mm print. It looks excellent and I cannot see layer lines in the photographs, let alone with my eyes. But I could not honestly tell you it beats the 2h25m print by an amount worth an extra hour and a half. A couple of areas picked up stringing that the faster prints did not have, which I suspect is the speed change.
For a bigger model, spend the time where it shows
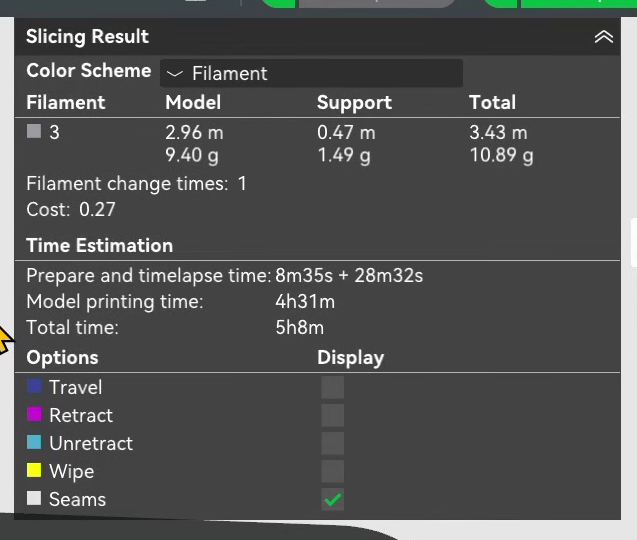
A lot of people told me I should have used variable layer height on the previous video, and they were right. It lets you set quality per height band rather than across the whole model, so you can put the fine layers on the head and hands and leave the rest coarse. On the ogre from the 0.4mm test, the defaults sliced to eight hours. Refining only the areas I already knew were bad, the head, hands, hammer and the tops of the feet, brought it to 4h31m of printing and 5h8m total, and it came out smooth apart from one band on the right shoulder that I simply missed.
Where it goes wrong
Your first 0.2mm print uses settings you thought you had left behind
Why: Overrides follow the project, not the nozzle. Switching to a 0.2mm nozzle loads different profiles, but values you changed on the old one are still applied on top.
Fix: Before the first slice, go through the tabs and look for orange labels with a reset arrow next to them. That is Bambu Studio telling you the value is not the profile's. It cost me a print here, and only because I happened to look partway through.
Thin parts keep snapping off no matter what you change
Why: The mace handle, the hanging cloak and the ankles broke on this model across every single profile, including the paid one. That is not a settings problem. Those features are thinner than the print process can reliably support and they need to be thicker in the model.
Fix: Stop tuning and change the approach. Reorient the print so those areas need fewer supports, thicken them if the model is yours to edit, or accept that you will be gluing. Do not read a repeated break as evidence that a profile is bad.
A fragile part gets worse after you lower the infill
Why: The community settings drop sparse infill to 12%, which is a sensible time saving on a model that is mostly bulk. On a 40mm miniature it also means very little material inside an ankle.
Fix: Use a modifier to raise infill only in the fragile region rather than lifting it across the whole model. That is what I would do next time, and it keeps the time saving everywhere it is harmless.
Supports snap off during the print after you enable variable layer height
Why: Changing layer heights per band changes what the supports are gripping. Two prints failed this way before I got a usable ogre.
Fix: Back the support angles off to something less aggressive and reprint. Branch angle went back to the default and the threshold angle to something milder, and the third attempt held.
Stringing appears on your highest quality attempt
Why: It showed up only on the last print, which was the only one where I slowed the speeds down substantially. People warned about exactly this in the comments on the previous video.
Fix: Slow down one thing at a time rather than everything at once, and compare against a print at default speeds. Going slower is not free.
What I would do differently
- Order a silicone nozzle protector at the same time as the nozzles. The set does not come with one, mine is filthy and I still have not replaced it, and it costs a couple of dollars.
- Put a modifier on the fragile areas to keep the infill up locally, instead of choosing between a strong ankle and a fast print.
- Angle the model on the plate to avoid supports on the thin parts in the first place. Nearly every defect left on these prints came from support removal rather than from the settings.
- Stop tuning earlier. Somewhere around the second or third print the changes stopped being visible without going looking for them, and the last print cost an extra hour and a half for something I would struggle to point at.
Read next
- Using modifiers in Bambu Studio to change part of a print
This page tells you twice to put a modifier on the fragile areas rather than raising infill across the model. That is how you do it, with the time and filament each approach actually costs.
- Getting more detail out of a 0.4mm nozzle
The 0.4mm test this one is measured against. Worth reading first if you have not tuned the nozzle you already own, because that is the comparison that makes the 0.2mm answer mean anything.