Bambu Lab A1
Getting more detail out of a 0.4mm nozzle
A 0.4mm nozzle is the one your printer came with, and it will do far more on a miniature than the stock profile suggests. This is four prints of the same model, changing settings between each, with the times and the results for all four. It also covers the print where pushing further made things worse, because that turned out to be the most useful result of the set.
What I used
What these four prints are in. I buy it direct from Bambu; this is the same filament on Amazon. Matte hides layer lines a little better than the basic filament, which flatters a miniature, though every comparison here is like for like so nothing on this page depends on it. Any PLA follows the same settings. Watch out for lookalikes: there are third-party filaments sold as "Bamboo PLA Matte" for Bambu printers, which is a different product from a different company.
Nothing here requires glue. This ogre has a thin hammer handle that snapped off during support removal on more than one of these prints, and this is what I stuck it back on with. Whether you need any depends entirely on your own model, and if it has no thin protruding parts you will not touch it.
Steps
Print the stock profile first
Slice the model with no changes at all and print it. It is tempting to skip this, and then you have nothing to judge the tuning against. On this ogre the stock profile came out at 1 hour 21 minutes. Turn supports on, and if Bambu Studio reports a manifold edges error on load, let it repair the model. That warning means the mesh has small gaps or inverted faces and the repair is usually all it needs.
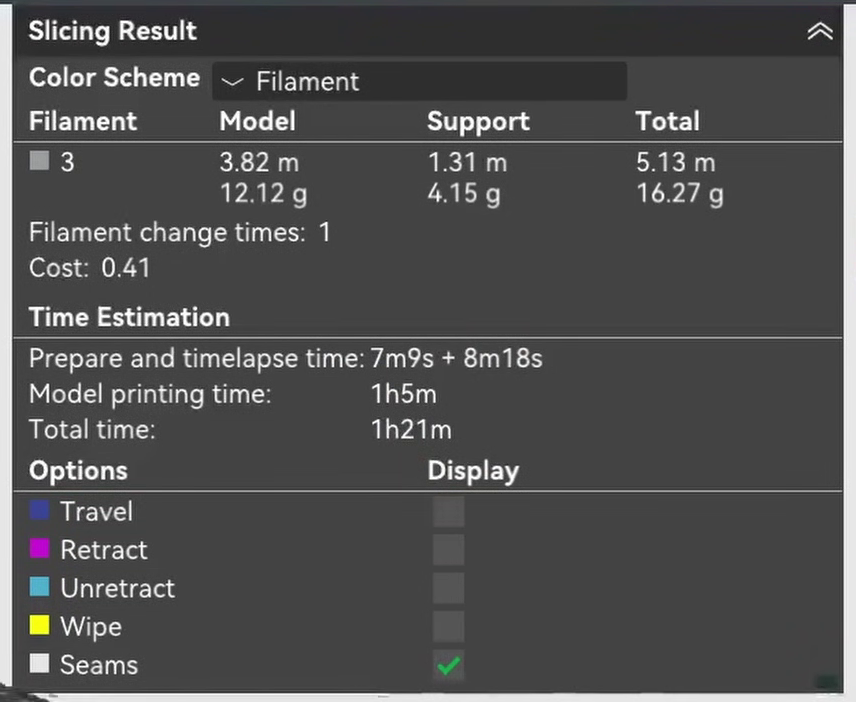
Start from the 0.12mm high quality preset and drop the layer height to 0.08mm
This is the single change that does the most. Layer height is the vertical resolution, so it decides how visible the stepping is on every sloped and curved surface, which on a miniature is most of it. Everything after this is refinement. It is also what costs the time: the same model goes from 1 hour 21 to roughly three and a half hours on layer height alone.
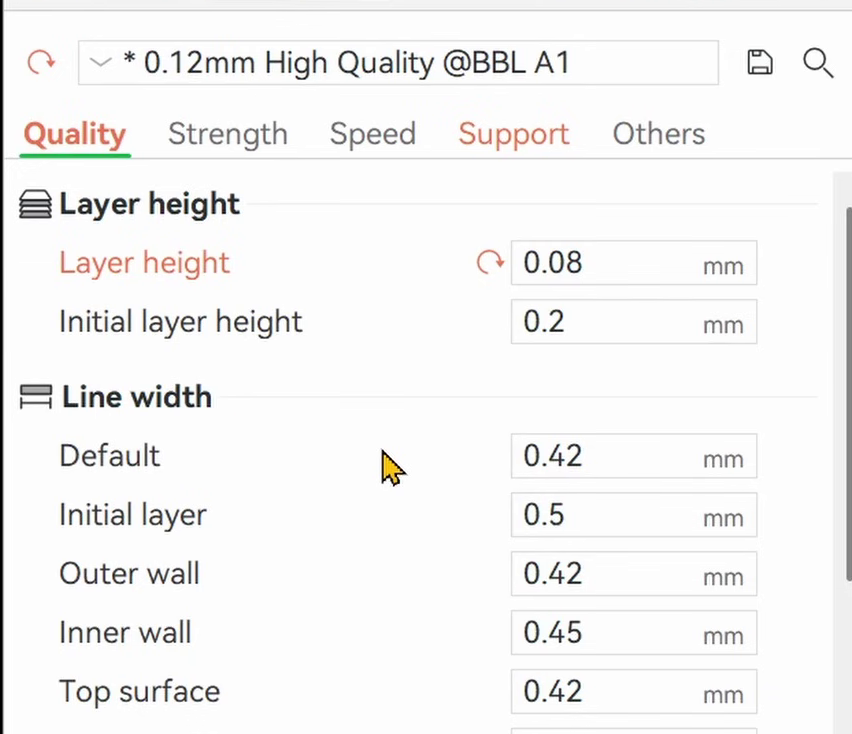
Narrow the lines you can actually see
Turn on the advanced toggle to show the rest of the settings. Drop the outer wall and top surface line width to 0.35mm. A thinner extrusion traces fine detail more accurately, the difference between drawing with a fine liner and a marker. Leave inner walls and infill wide, because nothing about them is visible and narrowing them only costs time.
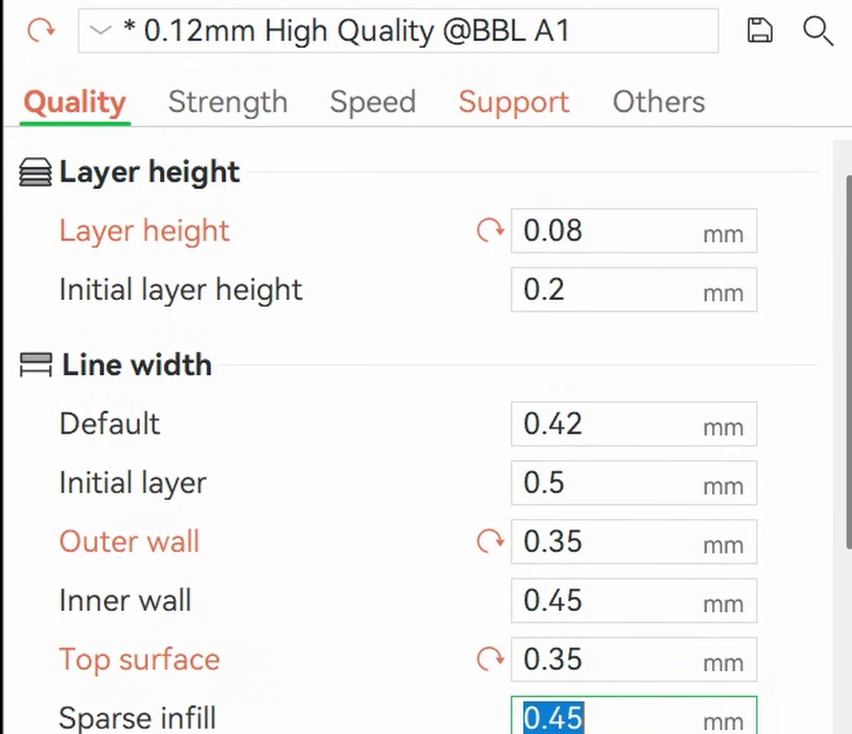
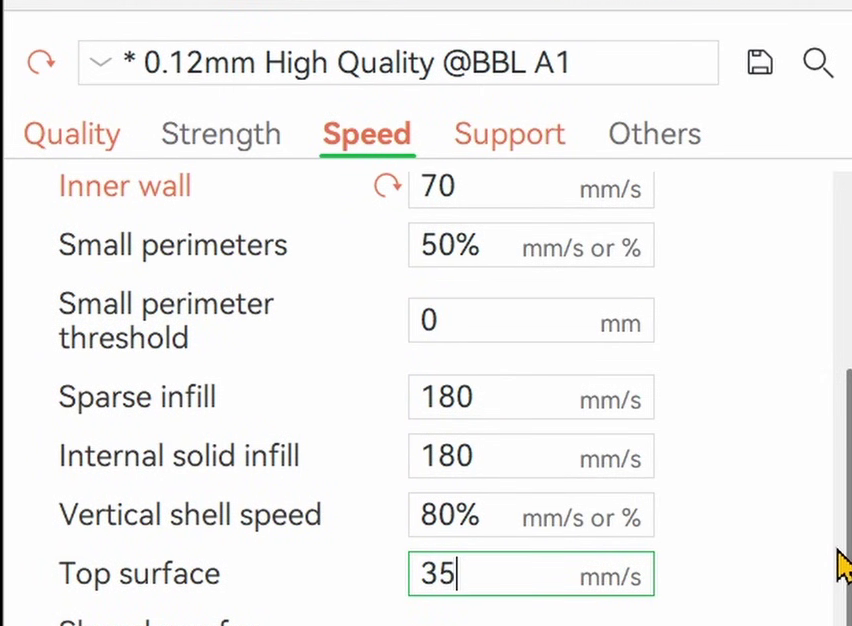
Slow down the surfaces you can see, and only those
Outer wall speed to 30mm/s. Slower movement means less vibration and less ringing, and it gives each layer longer to cool before the nozzle comes back to it. Top surface to 35mm/s, which covers shoulders, the top of a helmet, the face of a shield, anything pointing at the ceiling. Leave inner walls at 70mm/s. They are inside the model and precision there buys nothing.
Open the gap between supports and model
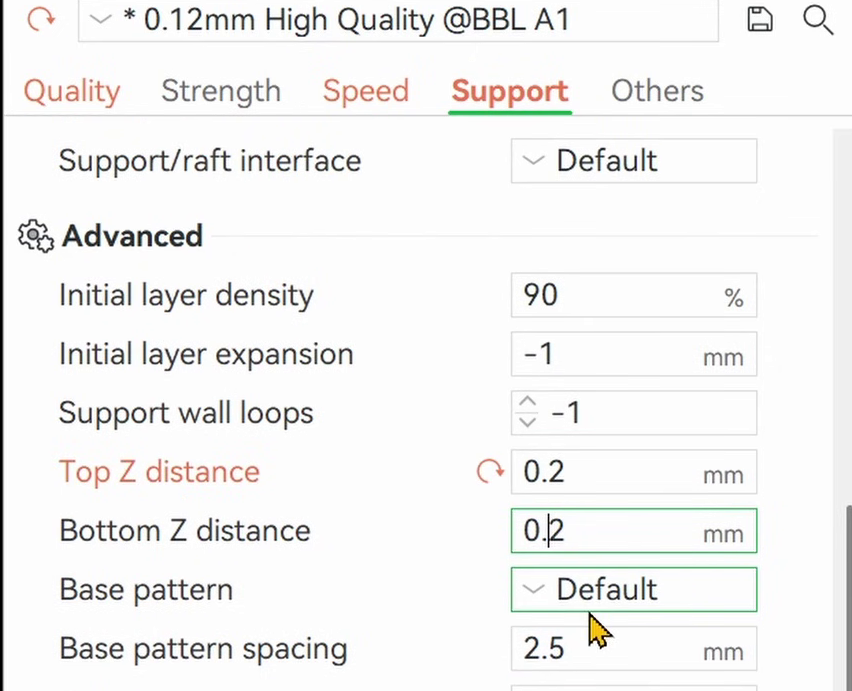
Support Z distance, top and bottom, from 0.12mm to 0.2mm. Too close and the supports fuse to the print and take surface with them when they come off. Too far and the overhang droops before it reaches anything. 0.2mm removes cleanly on this model without the overhangs sagging.
Drop the filament temperature
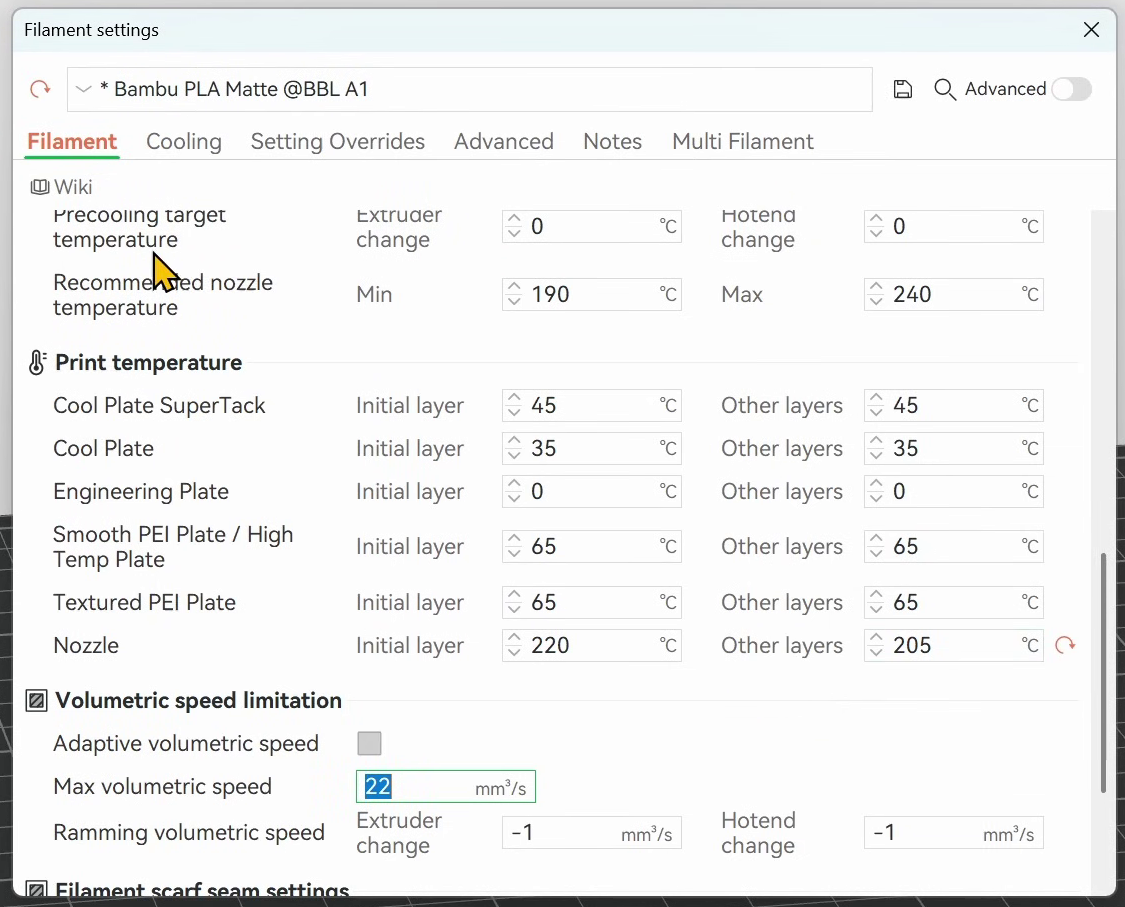
Filament settings, the three dot menu, then edit. Under Print temperature, find the Nozzle row and take Other layers from 220 to 205. Leave Initial layer at 220, because that one is doing bed adhesion rather than detail. Hotter plastic is runnier, which means more ooze and more shrinking, and a miniature is mostly short travel moves between small features where that shows. Do not chase this much lower or layer adhesion starts to go.
I used: Bambu Lab PLA Matte
Turn the cooling up, but not on the first layer
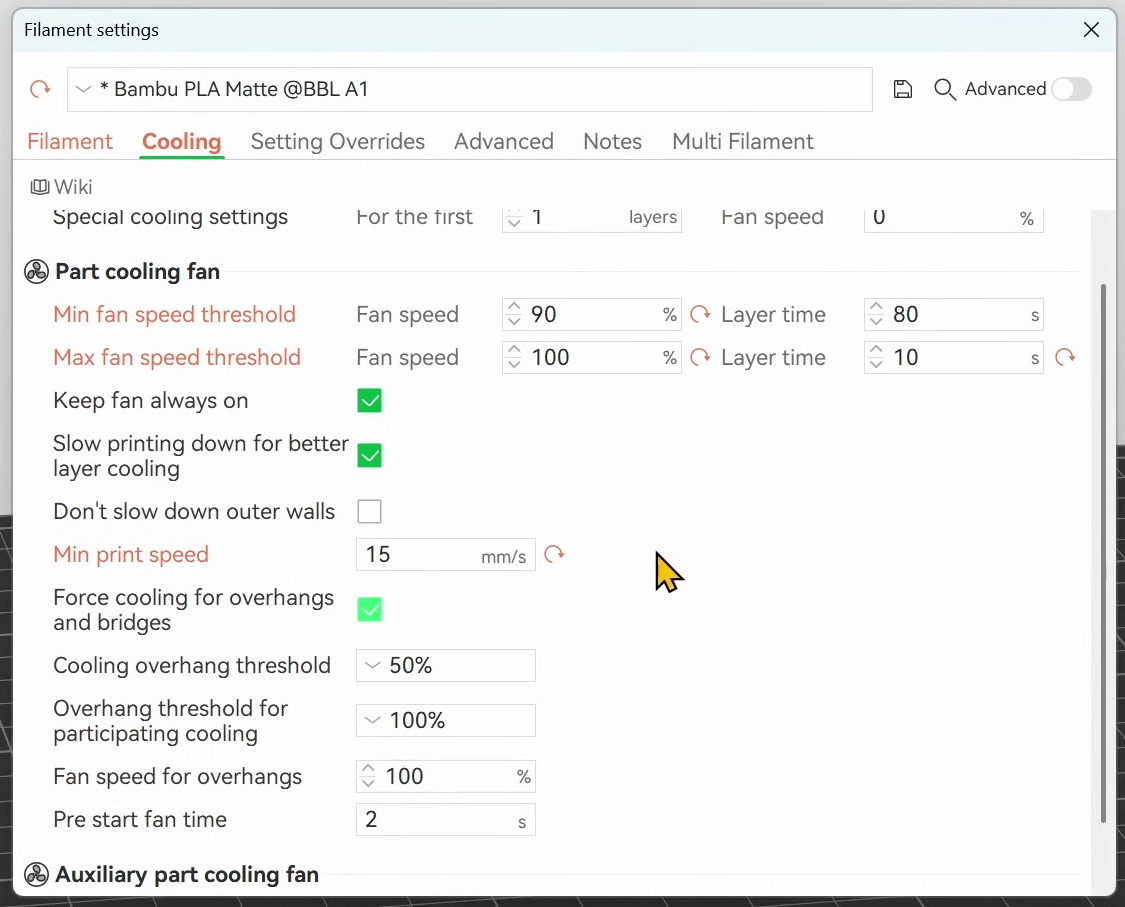
Still in filament settings, on the Cooling tab. Under Part cooling fan, set Min fan speed threshold to 90% and Max fan speed threshold to 100%. Small features come back around quickly, and if the previous layer has not set you get a blob instead of a detail. Set the Layer time next to Max fan speed threshold to 10 seconds, so the printer slows down whenever a layer would otherwise finish faster than that. That is what saves horns, fingers and weapon tips. Drop Min print speed from 20 to 15mm/s, which is the floor it will slow to in order to hit that layer time. Leave Special cooling settings at the top of the tab alone: it is already set to zero fan for the first 1 layers, and you want that heat for bed adhesion. Cooling layer one is how a print comes off the plate halfway through.
Slice, print, and compare against the baseline
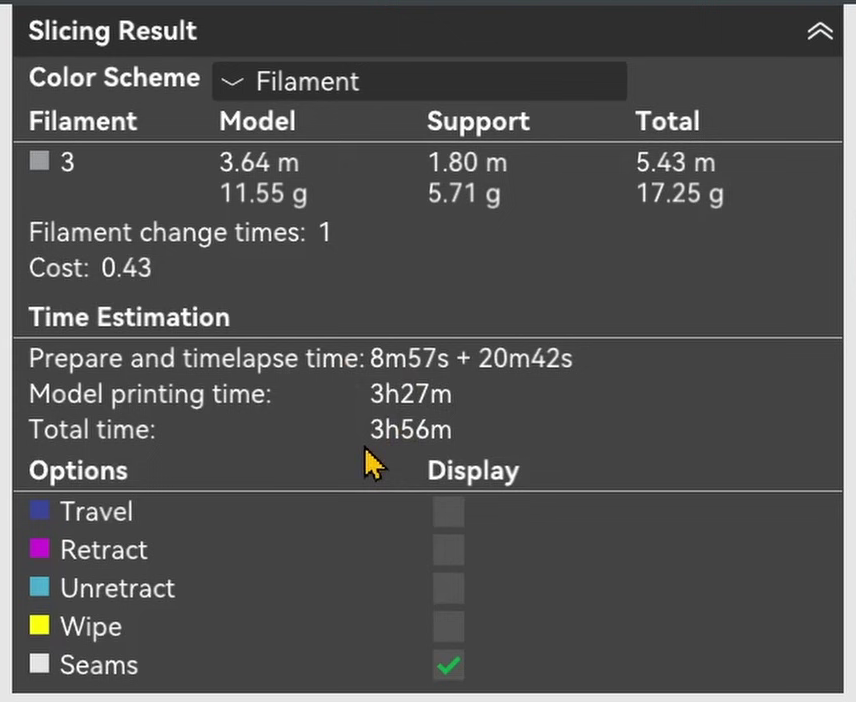
This came out at 3h56m total against the baseline's 1h21m. Read the model printing time rather than the total if you are comparing profiles, since the total includes prepare and timelapse: 3h27m of actual printing against 1h5m. On the ammo belt the baseline shows layer lines across every round while the tuned print shows individual bullets. On the shield the wood grain reads as wood grain rather than as layer lines pretending to be wood grain. Top surfaces that looked like a contour map are close to smooth.
Take the supports off slowly
This is where prints get damaged, and it has nothing to do with the profile. Work supports away from thin protrusions rather than pulling against them, and brace anything long while you do it. On this ogre the hammer handle snapped off on more than one print and I glued it back on. Your model may have no part thin enough to care about, or it may have several. If something breaks in the same place every time, that is the model telling you it is too thin there, not the settings.
I used: Loctite Super Glue Liquid Professional, 20g (3 pack)
If you need more than one, find the compromise
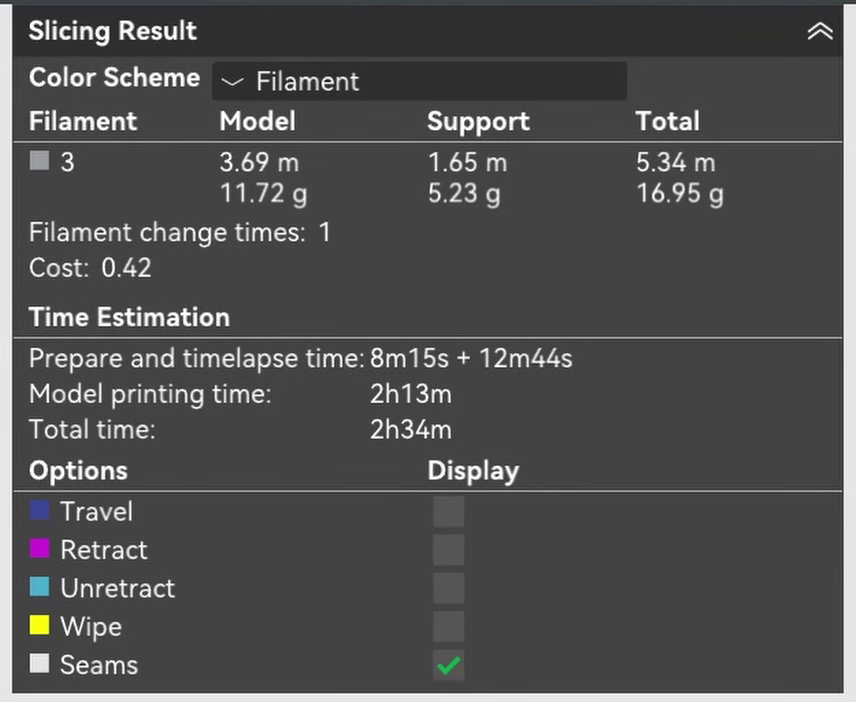
Nearly four hours is fine for a display piece and not fine for an army. Starting from the 0.16mm high quality preset, layer height 0.14 gave 2h20m, 0.12 gave 2h44m, and 0.13 landed on 2h34m. Note that changing the preset alone does nothing while the layer height is still overridden at 0.08, which is worth knowing before you conclude the preset is broken. The compromise print is clearly better than stock, with sharper detail and cleaner surfaces, and it does not touch the 0.08mm print. Upward facing surfaces are where it gives most of that back.
Where it goes wrong
You turn on more optimizations and the print comes out worse
Why: Switching the wall generator to Arachne and the wall order from inner-outer to outer-inner both sound like upgrades, and on a model that was already printing well they introduced problems: more visible layer lines on the loin cloth and beard, lines on the shield edge that were not there before, artifacts on the chest, and stringing on the helmet. The layer lines across the back looked deeper and slightly offset, which points at a small extrusion change.
Fix: Change one thing at a time and keep the print you are comparing against. Arachne and outer-first walls are real tools with real uses, but they are not universally better, and a model that already prints cleanly is exactly the case where they can cost you. More optimization is not the same as better optimization.
The print detaches from the plate partway through
Why: Turning the fan up on the first layer. Aggressive cooling is right for the rest of a miniature and wrong for the layer that has to stick.
Fix: Leave first layer fan speed at zero, and raise the minimum and maximum fan speeds for every layer after it.
Damage to the model that the settings did not cause
Why: Support removal. The ammo belt on the tuned print here was chewed by being too aggressive getting supports off, not by anything in the profile.
Fix: Judge a profile only on the surfaces you did not touch with pliers. If a defect appears in the same place on every print, it is the model or the supports rather than the settings, and no amount of tuning will fix it.
What I would do differently
- Use variable layer height. A lot of people said so in the comments on the video this page comes from, and they were right: it is the obvious way to spend the time budget where it shows instead of spreading it evenly over the whole model. This test did not use it. A later test on the same ogre did, and that will get its own page.
- Keep the baseline print on the desk while judging the others. The third print here looked fine on its own and only read as worse next to the second one.
- Decide what the model is for before choosing a profile. Four hours is right for a display piece and wrong for a tabletop army, and the 2 hour 34 compromise exists precisely because there is no single correct answer.
Read next
- Is a 0.2mm nozzle worth it for small prints?
The follow-up promised above. It is the variable layer height test on this same ogre, which brought eight hours of defaults down to 5h8m, and it answers whether a 0.2mm nozzle beats everything on this page.
- Using modifiers in Bambu Studio to change part of a print
For the fragile areas that broke here no matter what the profile said. A modifier changes settings on one region of a model instead of all of it, which is the tool this page kept needing and did not use.