Bambu Lab A1, Bambu Studio 2.7.1.62
Using boolean operators in Bambu Studio
Bambu Studio redesigned the boolean panel in 2.3, which means most of the tutorials you will find for this, including the two earlier ones on this channel, show an interface that no longer exists. This page is the current one. The project is a small box with a lid and a press-fit handle, chosen because it needs all three operations for real reasons rather than as a demonstration.
Worth saying up front, because the comments argue about it every time: a slicer is not a CAD package and this is not a substitute for one. What it is good at is the job where you already have models and want to combine or cut them, and opening a CAD tool to put a hole in something would take longer than doing it here.
Steps
Check which interface you have before you follow anything
Open the boolean panel and look at the tabs. If you see Union, Intersection and Subtraction as three tabs across the top, you are on the current interface and this page applies. The panel was redesigned in 2.3, so anything showing a single dialog with a dropdown is a tutorial for an older release. Everything here was filmed on 2.3.0.70 and re-confirmed on 2.7.1.62 in August 2026, and the workflow has not moved between those.
Build the lid from two rounded rectangles
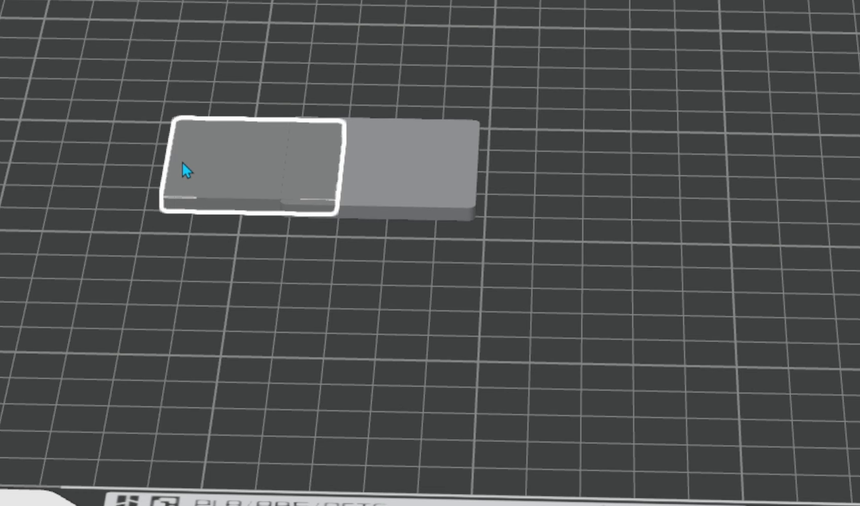
Right click the plate and create a rounded rectangle at 40 x 40 x 3. Make a second one at 35.6 x 35.6 x 3. That 35.6 is doing real work: it is the part that drops inside the box, and the gap against a 36mm opening is the clearance that lets the lid seat instead of jamming. Tolerance on a fitted part is something you decide now, not after printing.
Merge first, because nothing else works until you do
Select both rectangles in the object list, right click, Merge. This is the step people get stuck on, and it is worth understanding rather than memorising: the boolean tools operate within a single object, so two separate objects on the plate have nothing to boolean against each other. Merge is also what lets you position one relative to the other. Move the smaller rectangle up 3mm so it sits on top of the larger one, then right click it and centre it.
Merge is not the same as union, and the difference matters. Merge groups parts while leaving them individually editable. Union fuses them into one mesh you can no longer take apart. Merge is the setup; union is the commit.
Union the lid into one object
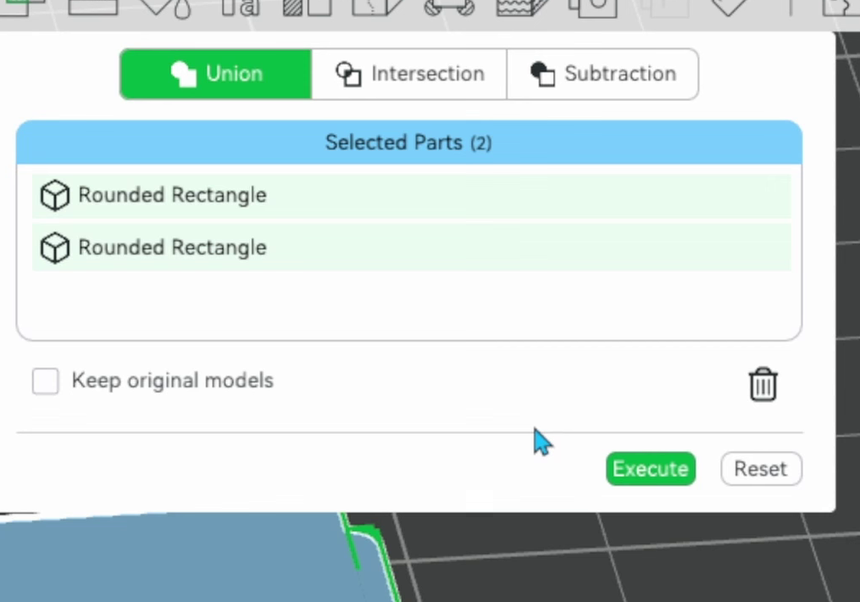
Select the assembly, open the boolean panel, and pick the Union tab. Union takes a single flat list, Selected Parts, with both rectangles already in it. There is no ordering to get right here, which is worth noticing because subtraction is a different story. Untick keep original models, since you want one lid rather than a lid plus the two pieces that made it, then Execute. Rename the result in the object list while you are there, because you are about to have several objects and they will all be called Rounded Rectangle otherwise.
Build the box, and hollow it with subtraction
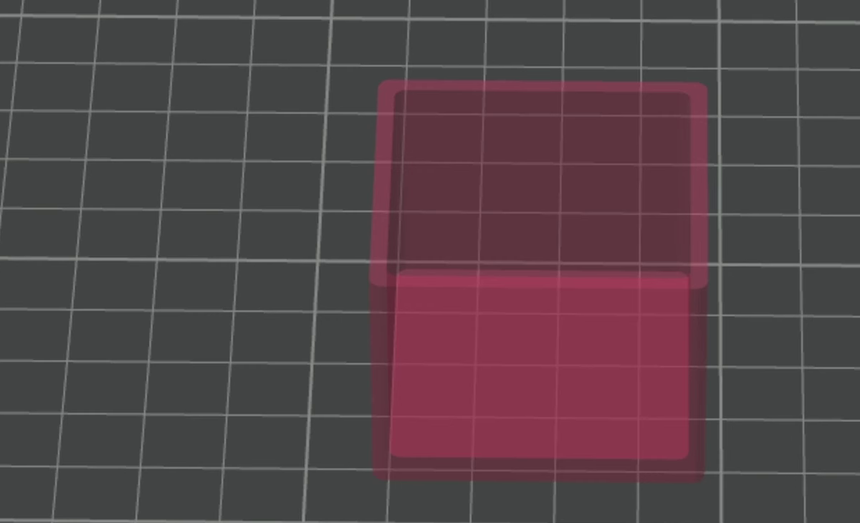
Two more rounded rectangles: 40 x 40 x 30 for the outer box, and 36 x 36 x 40 for the cutter. The cutter's height only has to be at least as tall as the box, so 40 is fine and gives you room to position it. Centre the cutter, which drops it inside the outer box, then select both and merge. Move the inner one up 2mm. The 36 against 40 gives a 2mm wall all round, and moving it up 2mm gives a 2mm floor.
Subtraction, the one place the order matters
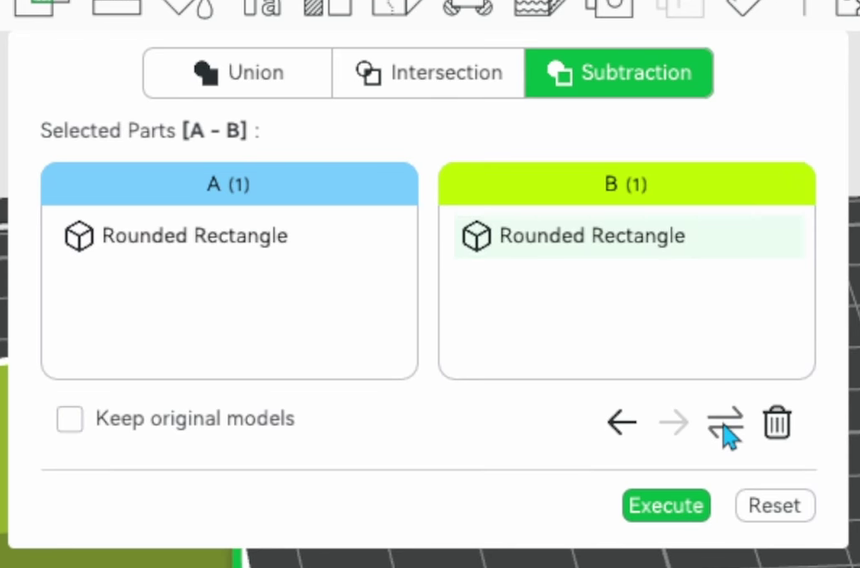
Select the assembly and pick the Subtraction tab. Unlike union and intersection, this one splits into two panels, A and B, and computes A minus B. Colour coding helps: A is blue, B is green, and the models highlight to match. This is the part of the redesign that causes the most trouble, and the video this page comes from is fairly blunt about why. You can no longer pick objects from the object list while the panel is open. The arrows move a part from one side to the other and the double arrow swaps them, which you have to work out by trying. And the panels are labelled A and B rather than from and with, which is what they actually mean.
Get the outer box into A and the cutter into B, then Execute. Two things will happen that look like bugs and are not. The panel swaps the objects around after it runs, and leaving the panel deselects everything you had selected.
Make the handle with intersection
Intersection keeps only the volume where two parts overlap, and discards everything else. That makes it the tool for taking a shaped piece out of something rather than cutting a hole in it. Flip the lid upside down, create a cylinder at 10 x 10 x 3, merge it with the lid and centre everything, then position the cylinder about halfway into the lid surface. On the Intersection tab, tick keep original models this time, because you want the lid and the cylinder to survive, then Execute. You get a third object: the half-cylinder where the two overlapped, which becomes the handle.
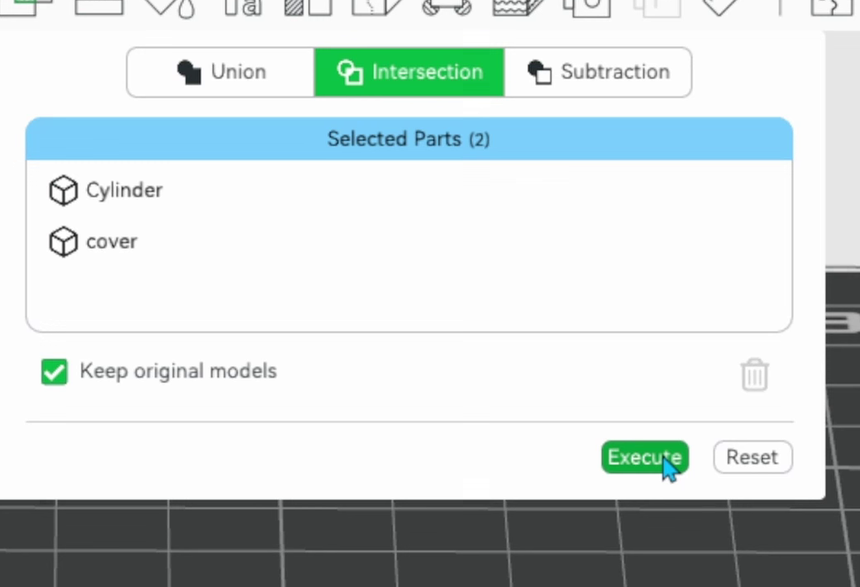
Subtract the handle to cut its own socket
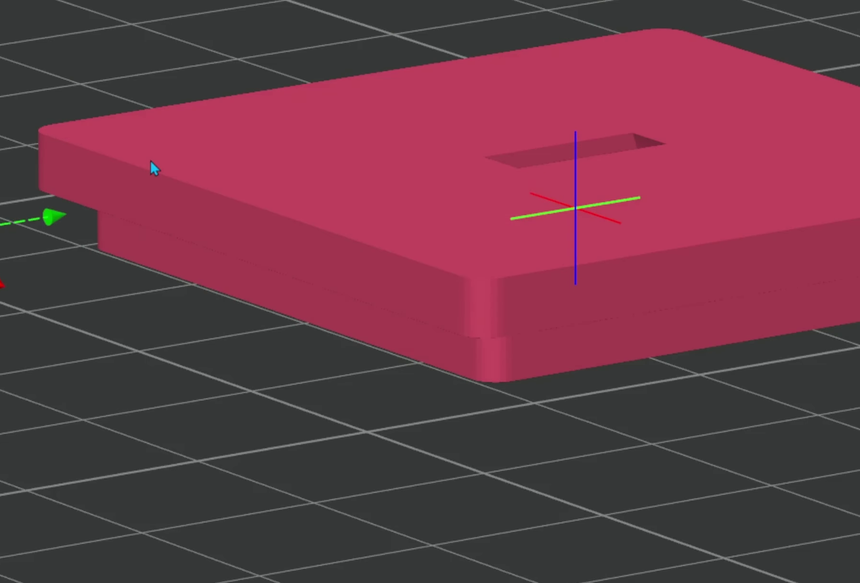
Rotate the half-cylinder 180 degrees so its flat face is on the plate, rename it handle, centre it and merge it with the lid. Move it up until it just penetrates the lid surface. Then Subtraction again, cover in A and handle in B, and you have a notch shaped exactly like the handle. This is the useful pattern worth taking away from the whole page: intersection makes the part, subtraction makes the socket for it, and the two match by construction rather than by measurement.
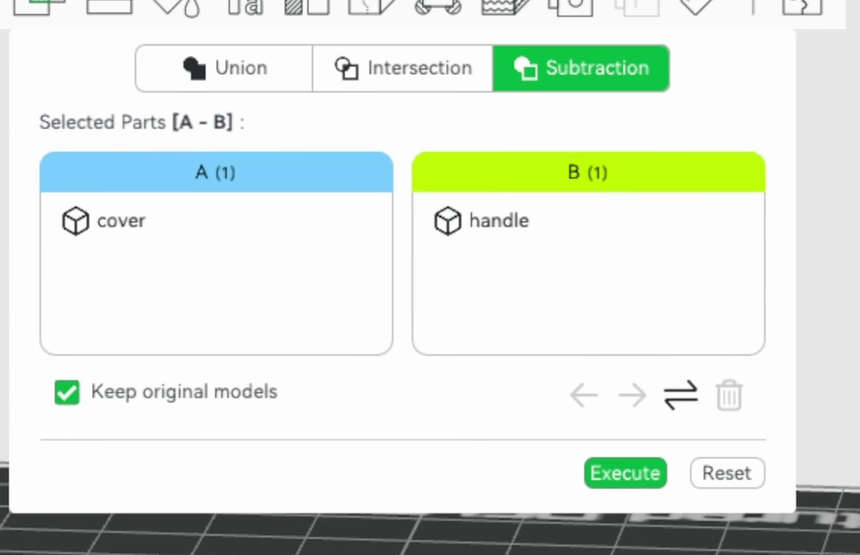
Shrink the handle so it actually fits
A socket cut by the part that fills it is a zero clearance fit, which in practice means it will not go in. Scale the handle down to about 9.7 across and 2.95 tall, from 10 and 3. That is roughly 0.3mm of room, and it turns an interference fit into a press fit. This is the same decision as the 35.6 on the lid, arrived at the same way, and it is the thing the slicer will not do for you.
Print it and check the fit
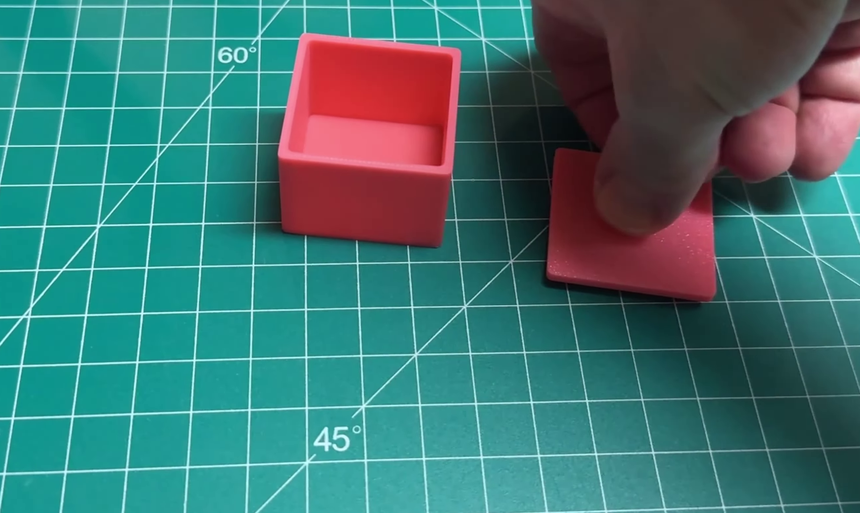
Uncheck anything you are not printing yet rather than deleting it, print, and try the pieces together. The lid seats into the box and the handle presses into its notch, and both of those came from clearance decisions made in the slicer rather than from anything the printer did.
Where it goes wrong
There is no Merge option, or the boolean button is greyed out
Why: Merge acts on a selection of two or more objects, and the boolean tools act inside one object. With a single object selected there is nothing to merge and nothing to boolean, so both look broken in the same way.
Fix: Select both objects in the object list first, using Control to add to the selection, then right click. Merge is still on that menu on 2.7.1.62, confirmed August 2026, despite reports that it had been removed in the 2.5 releases.
You cannot work out which object should be A and which should be B
Why: The panels are labelled A and B and the operation is A minus B, but nothing on screen tells you which is the thing you are keeping. It is the single most asked question about the redesigned panel.
Fix: Read A as from and B as with: subtract from A, with B. So the object you are keeping goes in A and the cutter goes in B. The colours are the quickest check, A blue and B green, since the models highlight to match before you commit.
A subtraction silently does nothing, no matter how many times you run it
Why: Hit reproducibly straight after an intersection, with the resulting parts still grouped. Repeated attempts changed nothing and gave no error.
Fix: Ungroup the objects, then regroup only the two you need, and run the subtraction again. It worked immediately after that. Whether this is a general bug or specific to that sequence is not established, but the ungroup and regroup is cheap to try before you start doubting your setup.
Your selection disappears every time you come out of the panel
Why: Leaving a boolean menu deselects the objects. It is behaviour, not a fault, and it is tedious on a model that needs several operations in a row.
Fix: Nothing to fix, but expect it and reselect from the object list rather than from the viewport, which is faster and does not depend on what is visible.
The A and B panels have swapped themselves after you hit Execute
Why: The panel reorders the objects after it runs. It looks like the operation went the wrong way round.
Fix: Check the model rather than the panel. If the result is what you wanted, the swap is cosmetic. It matters only if you were about to run a second operation assuming the panel still reflected the first.
Every object in the list is called Rounded Rectangle and you cannot tell them apart
Why: Primitives are named for their shape, so a project built from four rectangles gives you four identical entries, and the boolean panel shows those same names.
Fix: Rename each object as soon as you create it. It costs seconds and it is the difference between reading the A and B panels at a glance and guessing.
You are not sure whether to use a subtraction or a negative part
Why: They produce the same visible result and the question comes up repeatedly. The difference is not the outcome, it is whether you can change your mind.
Fix: A mesh boolean is destructive: it rewrites the model and you cannot resize the cutter afterwards without undoing your way back. A negative part is non-destructive and stays editable, so you can adjust it later. Use a negative part while dimensions are still moving, and a boolean when they are settled.
What I would do differently
- Rename everything on creation rather than after the fact. Half the difficulty with the subtraction panel is not the panel, it is three objects sharing a name.
- Decide clearances before modelling rather than after printing. Both fits here, the 35.6 lid and the 9.7 handle, were the same decision made twice, and neither is something the boolean tools can infer.
- Try a negative part first when the dimensions are still moving, and only commit to a boolean once the fit is right. Undoing a mesh boolean several steps later is the expensive way to learn this.
- Check the panel behaviour again after the next update. This interface has changed twice in a year, and the older videos on this subject stopped matching reality within months of being published.
Read next
- Using modifiers in Bambu Studio to change part of a print
The non-destructive half of the same toolset. Negative parts and modifiers sit on the same right click menu as these operations, and they are what to reach for when you want the cut to stay editable.
- Getting sharp text on a 3D print in Bambu Studio
The text tool can run as a part, a cut or a modifier, so cutting lettering into a model is a boolean operation in a different wrapper. That page covers getting the letters to actually print once you have.