Bambu Lab A1
Print by object in Bambu Studio
When a plate holds several models in different colors, Bambu Studio's default print sequence goes layer by layer across all of them, swapping filament every time it moves between colors. Print by object prints each model start to finish before moving to the next, so the swaps mostly disappear. On the plate shown here that is the difference between 41 filament changes and 6.
Steps
Slice normally first, so you have something to compare
Lay the plate out the way you would anyway and slice it with the default print sequence. Note the filament change count and the estimated time in the preview. The example here is four round fidget clicker tops in white and red sitting on two blue bases: 41 filament changes and 1 hour 46 minutes. Without the bases the same tops take about 22 minutes, so almost all of that extra time is the printer swapping between the blue and the white and red.
Switch the print sequence to by object
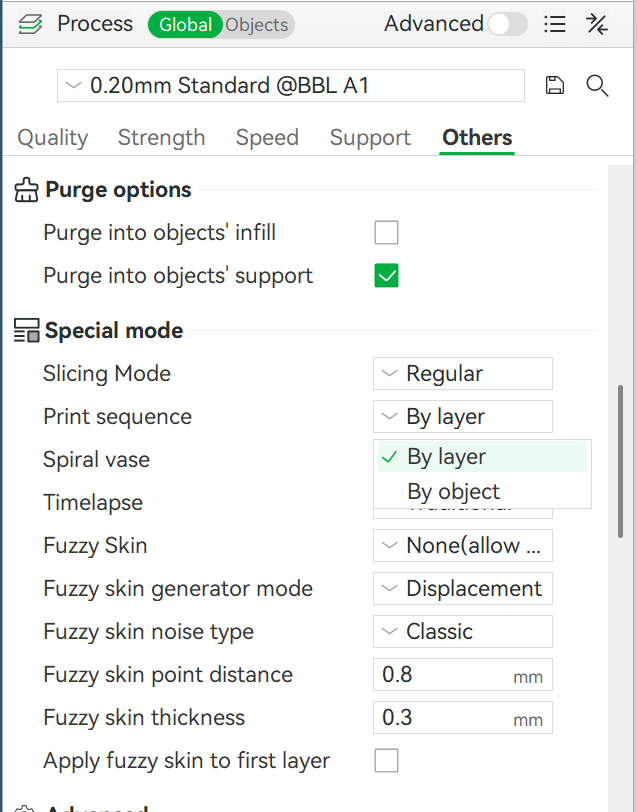
In the Process panel, make sure Global is selected rather than Objects. Open the Others tab, scroll to the Special mode group, and change Print sequence from By layer to By object. Studio warns that timelapse will not work in this mode, which is fine if you were not recording one. This setting is genuinely hard to find, and the Bambu wiki describes it as living under Special mode while the panel path goes through Others, so both descriptions are right and neither is complete on its own.
Clear the clearance errors
Expect a red error immediately, naming the object: "<name> is too close to others, and collisions may be caused." Studio draws a circle around each object showing the space the tool head needs. On an A1 with a 0.4 nozzle that spacing is 73mm, which is why a plate that looked roomy suddenly is not. Either drag the models apart until the circles stop overlapping, or press the arrange objects on current plate button, which knows you are in by object mode and spaces everything for clearance on its own. The arrange button is the faster option and gets it right on a crowded plate where manual placement runs out of room.
Merge the models that share a color
Select models that print in the same colors, right click, and choose Merge. They become one object as far as the sequencer is concerned, so it stops swapping filament between them. Hold Control to add to a selection. On the example plate the four tops merge into one object and the two bases merge into another: six models, two objects, and the slice drops to 6 filament changes and 56 minutes. Do not merge models that use different colors, because that puts the swaps straight back and defeats the point.
Put the tallest object last
Drag objects in the object list to set the order. Print the tallest one last, because the tool head has to travel over everything already on the plate to reach the next object, and a tall finished print is something it can catch and knock over. Ctrl+E toggles the labels showing each object's place in the sequence, which is the quickest way to check the order came out the way you meant.
Raise the purge before you slice, not after
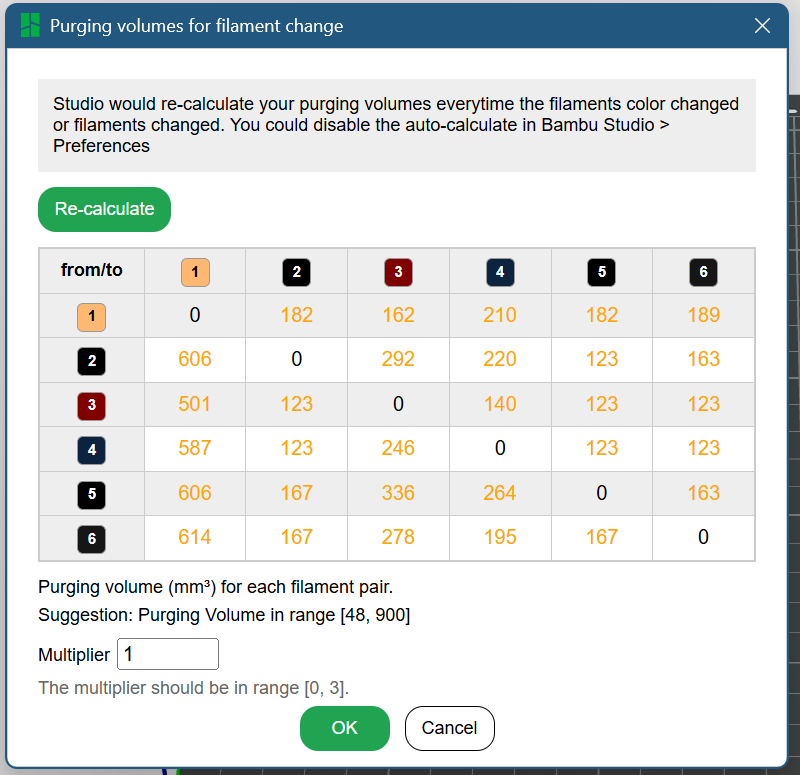
There is no prime tower in this mode, so the color left in the nozzle from the last object bleeds into the start of the next one. The Purging volumes button next to the Project Filaments heading opens a grid of purge volumes in mm3 for every filament pair. Studio suggests staying in the range 48 to 900. Note that the grid is not symmetrical: in the one shown here, going from filament 1 to filament 2 costs 182, while coming back the other way costs 606. Dark into light needs far more purge than light into dark. For a high contrast transition in either direction, raise the individual cells for those pairs. On a two color print the Multiplier field is quicker and does the same job, since the only pairs it affects are the ones in play. Studio recalculates this grid whenever filament colors change, which can undo an edit.
Know that print sequence also exists per plate
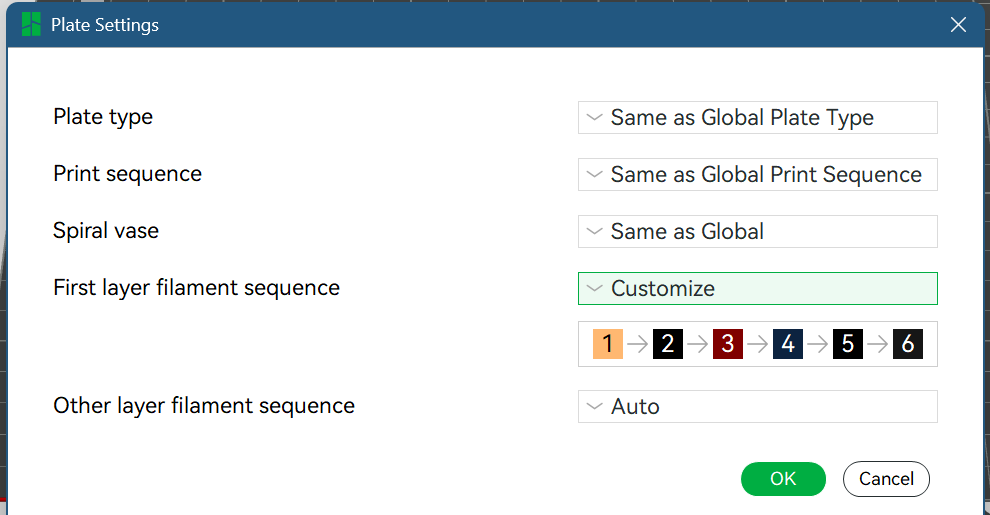
Clicking the settings icon on the build plate in the 3D view opens Plate Settings, which carries its own Print sequence defaulting to Same as Global Print Sequence. If the global setting appears to do nothing, check here. The same dialog sets the first layer filament sequence, which is worth knowing about separately because it controls the order colors are laid down rather than the order objects are printed.
Reslice and check the numbers moved
Slice again and compare the filament change count and estimated time against the first slice. If the change count has not dropped, something is still merged wrongly or the sequence is still set to by layer at the plate level.
Where it goes wrong
Slicing fails with "<name> is too tall, and collisions will be caused", or a finished print gets knocked over mid-job
Why: The tool head has to travel over the plate to reach the next object, so anything already printed is in its path. The limit that matters is extruder clearance height to rod, and on a Bambu Lab A1 with a 0.4 nozzle the shipped profile sets it to 25mm. Almost anything worth printing is taller than that. The limit only applies to an object that has another object still to be printed in its path, which is why the same plate can slice fine after reordering and why some people never see this error at all.
Fix: Print the tallest object last. It is the rule worth remembering and it fixes most cases, because the last object printed has nothing left to collide with and only has to fit under the printable height, 256mm on the A1. The clearance values live in the printer preset and are read-only unless you create your own preset. If more than one object has to clear 25mm, Bambu's wiki page on print by object sets out how placement and print order interact.
The prime tower disappeared and colors are bleeding into each other
Why: Print by object cannot use a prime tower. One tower cannot serve several objects that each have their own set of colors, so Studio removes it. That leaves the previous color sitting in the nozzle when the next object starts.
Fix: Raise the purge volume for the affected filament pairs before slicing, using the Purging volumes grid. High contrast pairs need the most. Multi-color objects still work fine in this mode, they just need more purge than they did with a tower.
One piece of a merged group failed and the whole print now has to be scrapped
Why: Merged models are a single object to the printer. The Bambu Handy app can skip an object mid-print, but it cannot reach inside a merge to skip one piece of it.
Fix: Nothing recovers this during the print. Skip the whole group or let it finish, then reprint the failed piece separately afterwards. This is the real cost of merging, and it is worth deciding up front whether fewer filament changes or per-piece recovery matters more for a given plate.
Splitting an object scattered everything across the plate
Why: Split separates every piece the object contains, not just the one you were after, and the pieces drop to the build plate rather than holding the position they had.
Fix: Expect to rearrange after any split. If pieces were stacked, that stacking is gone and has to be rebuilt. Position models where you want them and merge last, rather than merging early and splitting to fix mistakes.
Supports are needed on one model but not the rest of the plate
Why: The support settings in the Global process apply to everything on the plate.
Fix: Two ways round it. Turn on manual supports globally and paint supports only onto the models that need them, and only those get supports at slice time. Or open the per-object properties and give each object its own support settings, enabled, disabled or customized.
The by object setting cannot be found at all
Why: The Process panel has a Global and an Objects mode, and the setting only appears under Global. It also sits several groups down the Others tab rather than anywhere obvious.
Fix: Select Global, open Others, scroll to Special mode, and it is the Print sequence dropdown. If it is set correctly and behavior has not changed, check Plate Settings, which has its own print sequence.
What I would do differently
- Decide whether to merge based on how much a failed piece would cost, not just on filament changes. Merging four tops into one object saved most of the swaps here, but it also meant a single bad top could not be skipped on its own.
- Print by object is not always the right answer. If the plate has no color swaps to save, by layer is fine and does not bring the clearance rules with it.
- Set the purge volumes before the first slice rather than after seeing bleed on a finished print. Studio recalculates the grid whenever filament colors change, so it is worth checking the values survived any later edits.
Read next
- Getting a glossy resin dome on a 3D printed keychain
A four color plate this is worth trying on. Each keychain there costs 19 filament changes and puts more filament into purge and the wipe tower than into the part itself.